This article introduces the development framework based on the gateway, using Ubuntu as a Zigbee gateway to access the Tuya IoT platform, and can access all Zigbee sub-devices in the Tuya ecosystem.
Hardware Preparation
- ZS3L Module
- USB to Serial Port
- Any Zigbee sub-devices in the Tuya ecosystem
Hardware Connection
Refer to the ZS3L module specification and connect the ZS3L and USB to serial port pins according to the corresponding relationship in the table below.
| ZS3L | USB to Serial Port |
|---|---|
| TX | RX |
| RX | TX |
| RTS | CTS |
| CTS | RTS |
After the hardware is connected, insert the USB to serial port into the USB port of the PC, and use the code in the Appendix to read the firmware version number of the ZS3L module to check whether the hardware connection is normal.
Create a Product
Devices connected to the Tuya IoT platform have a unique Product ID (PID), which is obtained by creating a product on the Tuya IoT platform. Therefore, you need to create a product for the gateway, define the gateway's functions, and select the gateway's App panel. For detailed operating steps, please refer to Create a Product.
Program Development
Download the Development Kit
The steps to download the gateway development kit are as follows:
Install and log in to the IDE plugin in Visual Studio Code. For specific operations, please refer to Tuya Wind IDE.
Click New Development Framework on the Tuya Wind IDE homepage. Select TuyaOS SDK mode for the development mode, Gateway Device Development Kit for the type of development kit, and Soc/ubuntu/Linux/X86_64 for the development platform.
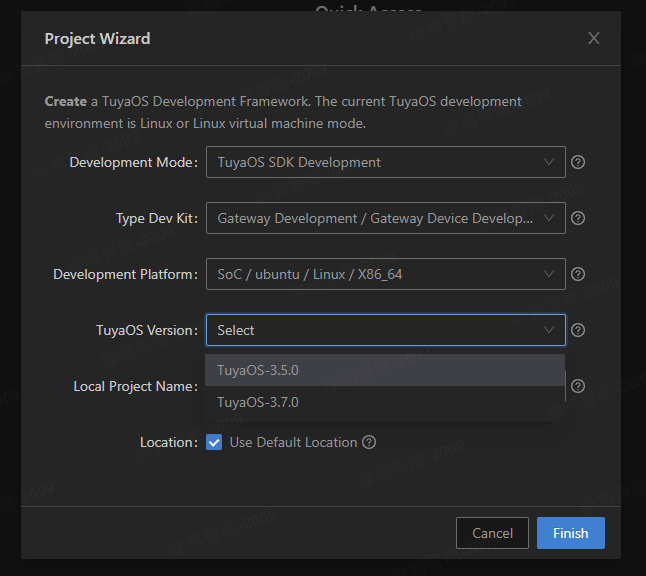
Select the latest version and click Finish to start downloading the development kit.
After the development kit is downloaded, the project will be automatically opened in Visual Studio Code, and its directory structure is as follows:
| Name | Description |
|---|---|
| apps | Application examples, that is, product development kits |
| build | Compilation configuration directory, which stores the compilation configuration files (you don't need to pay attention to this). |
| build_app.sh | Compilation script |
| docs | Doxygen interface document |
| include | Header file |
| libs | Library file |
| Makefile | Makefile file |
| output | Compilation output directory, where the generated program is located in the output/<application project name>_<version number> path. |
| scripts | Compilation framework (you don't need to pay attention to this). |
| vendor | Development environment. The development environment is downloaded online and executed locally during compilation. |
Compile the Application
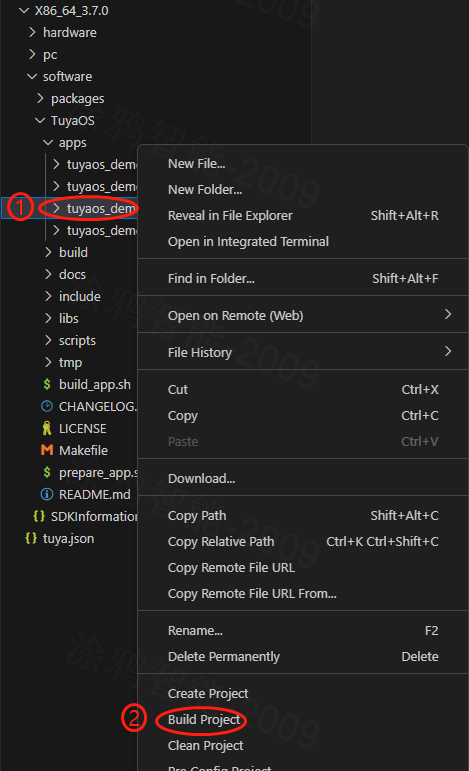
You can use tuyaos_demo_zigbee to develop Zigbee gateway products, which includes the functions of Zigbee gateway. Right-click tuyaos_demo_zigbee under the apps directory in the IDE and click Build Project to compile.
After the compilation is successful, an executable program will be generated in the output/tuyaos_demo_zigbee_<version number> directory.
Porting and Adapting
TuyaOS defines a standardized TuyaOS Kernel Layer (TKL), which aims to shield the differences between hardware and systems and achieve cross-platform compatibility. Therefore, you need to complete the adaptation of TuyaOS on the Ubuntu platform, please refer to Porting Guide for specific steps.
After the adaptation is completed, recompile the application.
Run the Application
There is a configuration file in the same-level directory as the executable program. You need to modify the configuration file and modify the following contents:
- Change the serial port device name recognized by your PC for the USB to serial port, and change
ctsto 1 to indicate the use of hardware flow control. - Change
pidto the PID you obtained when creating the product. - Change
uuidandauthkeyto the authorization information you are testing.
After modifying and saving the configuration file, run the executable program directly. Add the gateway through the Tuya Smart Life App, and add and control the Zigbee sub-devices.
Precautions
- Verify the hardware connectivity and obtain the version number of the ZS3L module before running the application, otherwise the application will not work.
- TuyaOS business-related TKL interfaces may differ on different products and need to be ported and adapted, mainly selecting network cards.
- The PID, UUID, and authkey need to be changed to your own, and the UUID and authkey cannot be reused and must ensure one machine and one password.
<a id="Appendix"></a>
Appendix
Code: Select all
/**
 * Usage:
 *   1. Copy the content and save it to ncp_test.c
 *   2. Modify the macro definition TEST_UART_NAME to the serial port device corresponding to the ZS3L module
 *   3. Compile
 *     $ gcc ncp_test.c -o ncp_test -lpthread
 *   4. Run the ncp_test program, if the module version can be read, the communication is normal, otherwise check the serial port
 *     Successful print example:
 *     Send data[5:5]: 1a c0 38 bc 7e
 *     Recv data[128:7]: 1a c1 02 0b 0a 52 7e
 *     Send data[4:4]: 80 70 78 7e
 *     Ncp reset success.
 *     Send data[8:8]: 00 42 21 a8 53 dd 4f 7e
 *     Recv data[128:11]: 01 42 a1 a8 53 28 15 d7 c1 bf 7e
 *     Send data[4:4]: 81 60 59 7e
 *     Ncp set version success.
 *     Send data[9:9]: 11 43 21 57 54 39 51 2b 7e
 *     Recv data[128:14]: 12 43 a1 57 54 39 15 b3 59 9c 5a 7a 1c 7e
 *     Send data[4:4]: 82 50 3a 7e
 *     COO manuId:0001, version:1.0.8.
 */
#include <errno.h>
#include <fcntl.h>
#include <stdarg.h>
#include <stdio.h>
#include <stdlib.h>
#include <unistd.h>
#include <pthread.h>
#include <string.h>

#include <termios.h>
#include <sys/ttydefaults.h>

#define TEST_UART_NAME      "/dev/ttyS1"
#define TEST_UART_SPEED     115200
#define TEST_UART_STIO_BIT  1
#define TEST_UART_RTSCTS    TRUE
#define TEST_UART_FLOWCTR   TRUE

#define UART_DEBUG_PRINTF   1

typedef unsigned int bool;
#ifndef FALSE
#define FALSE 0
#endif

#ifndef TRUE
#define TRUE 1
#endif

#ifndef NULL
#ifdef __cplusplus
#define NULL 0
#else
#define NULL ((void *)0)
#endif
#endif

static const struct { int bps; speed_t posixBaud; } baudTable[] =
{ { 600, B600    },
  { 1200, B1200   },
  { 2400, B2400   },
  { 4800, B4800   },
  { 9600, B9600   },
  { 19200, B19200  },
  { 38400, B38400  },
  { 57600, B57600  },
  { 115200, B115200 },
  { 230400, B230400 } };

#define BAUD_TABLE_SIZE (sizeof(baudTable) / sizeof(baudTable[0]) )

// Define CRTSCTS for both ingoing and outgoing hardware flow control
// Try to resolve the numerous aliases for the bit flags
#if defined(CCTS_OFLOW) && defined(CRTS_IFLOW) && !defined(__NetBSD__)
  #undef CRTSCTS
  #define CRTSCTS (CCTS_OFLOW | CRTS_IFLOW)
#endif
#if defined(CTSFLOW) && defined(RTSFLOW)
  #undef CRTSCTS
  #define CRTSCTS (CTSFLOW | RTSFLOW)
#endif
#ifdef CNEW_RTSCTS
  #undef CRSTCTS
  #define CRTSCTS CNEW_RTSCTS
#endif
#ifndef CRTSCTS
  #define CRTSCTS 0
#endif

#define ASCII_XON   0x11
#define ASCII_XOFF  0x13

// Define the termios bit fields modified by ezspSerialInit
// (CREAD is omitted as it is often not supported by modern hardware)
#define CFLAG_MASK (CLOCAL | CSIZE | PARENB | HUPCL | CRTSCTS)
#define IFLAG_MASK (IXON | IXOFF | IXANY | BRKINT | INLCR | IGNCR | ICRNL \
                    | INPCK | ISTRIP | IMAXBEL)
#define LFLAG_MASK (ICANON | ECHO | IEXTEN | ISIG)
#define OFLAG_MASK (OPOST)

static int  g_uart_fd    = -1;
static char g_ezspSeq    = 0;
static char g_ashFramNum = 0;
static char g_ashAckNum  = 0;
static char gcur_ezspSeq = 0;

static unsigned short halCommonCrc16(unsigned char newByte, unsigned short prevResult);

int ezspSetupSerialPort(unsigned char *uart_name, unsigned int bps, unsigned char stopBits, bool rtsCts, bool flowControl)
{
    int i = 0;
    struct termios tios, checkTios;
    speed_t baud;

    // Setting this up front prevents us from closing an unset serial port FD
    // when breaking on error.
    g_uart_fd = -1;

    while (TRUE) { // break out of while on any error
        for (i = 0; i < BAUD_TABLE_SIZE; i++) {
            if (baudTable[i].bps == bps) {
                break;
            }
        }

        if (i < BAUD_TABLE_SIZE) {
            baud = baudTable[i].posixBaud;
        } else {
            printf("Invalid baud rate %d bps\r\n", bps);
            break;
        }

        if ((stopBits != 1) && (stopBits != 2)) {
             printf("Invalid number of stop bits:%d.\r\n", stopBits);
            break;
        }

        g_uart_fd = open(uart_name, O_RDWR | O_NOCTTY | O_NONBLOCK);

        if (g_uart_fd == -1) {
             printf("Serial port open failed:%s\r\n", strerror(errno));
            break;
        }

        tcflush(g_uart_fd, TCIOFLUSH); // flush all input and output data

        //#define ANDROID_PLATEM
    #if 0//#ifdef ANDROID_PLATEM

        fcntl(*serialPortFdReturn, F_SETFL, 04000);
    #else
        fcntl(g_uart_fd, F_SETFL, FNDELAY);
    #endif

        tcgetattr(g_uart_fd, &tios); // get current serial port options

        cfsetispeed(&tios, baud);
        cfsetospeed(&tios, baud);

        tios.c_cflag |= CLOCAL; // ignore modem inputs
        tios.c_cflag |= CREAD; // receive enable (a legacy flag)
        tios.c_cflag &= ~CSIZE; // 8 data bits
        tios.c_cflag |= CS8;
        tios.c_cflag &= ~PARENB; // no parity
        if (stopBits == 1) {
            tios.c_cflag &= ~CSTOPB;
        } else {
            tios.c_cflag |= CSTOPB;
        }
        if (flowControl && rtsCts) {
            tios.c_cflag |= CRTSCTS;
        } else {
            tios.c_cflag &= ~CRTSCTS;
        }

        tios.c_iflag &= ~(BRKINT | INLCR | IGNCR | ICRNL | INPCK | ISTRIP | IMAXBEL | IXON | IXOFF | IXANY);

        if (flowControl && !rtsCts) {
            tios.c_iflag |= (IXON | IXOFF); // SW flow control
        } else {
            tios.c_iflag &= ~(IXON | IXOFF);
        }

        tios.c_lflag &= ~(ICANON | ECHO | IEXTEN | ISIG); // raw input

        tios.c_oflag &= ~OPOST; // raw output

        memset(tios.c_cc, _POSIX_VDISABLE, NCCS); // disable all control chars

    #if 0//#ifdef ANDROID_PLATEM
        tios.c_cc[VSTART] = ('q'&037);           // define XON and XOFF
        tios.c_cc[VSTOP] = ('s'&037);
    #else
        tios.c_cc[VSTART] = CSTART;           // define XON and XOFF
        tios.c_cc[VSTOP] = CSTOP;
    #endif

        tios.c_cc[VMIN] = 1;
        tSure, let me explain the workflow of the code.

The code first defines a function called `get_user_input` that takes a single parameter called `prompt`. The `prompt` parameter is used to display a message to the user asking for input. The user's input is then returned by the function.

After that, the code defines another function called `convert_to_fahrenheit` that takes a single parameter called `celsius`. This function converts the temperature in Celsius to Fahrenheit using the formula `(celsius * 9/5) + 32` and returns the result.

Then, the code calls the `get_user_input` function twice to get the user's input for the temperature in Celsius and the city name. The returned values are stored in variables `temp_celsius` and `city_name` respectively.

Next, the code calls the `convert_to_fahrenheit` function with the value of `temp_celsius` as the argument to convert the temperature to Fahrenheit and stores the result in a variable called `temp_fahrenheit`.

After that, the code prints out a message to the user including the city name and the converted temperature in Fahrenheit.

Finally, the code calls the `get_user_input` function again to ask the user if they want to convert another temperature. If the user responds with `yes`, the program runs again from the beginning. If the user responds with anything else, the program ends.