This article will introduce how to quickly experience the TuyaOS gateway development framework on Ubuntu system.
Prerequisites
- Ubuntu system is installed.
- Visual Studio Code is installed.
- Tuya Wind IDE plugin is installed on Visual Studio Code.
- Smart Life App is installed on the phone.
Download SDK
The TuyaOS development framework is released on the Tuya Wind IDE. We need to download the gateway development framework through the Tuya Wind IDE, as follows:
Click New Development Framework on the Tuya Wind IDE homepage.
Select TuyaOS SDK mode for the development mode.
Select Gateway Development Package for the development package type.
Select Soc/ubuntu/Linux/X86_64 for the development platform.
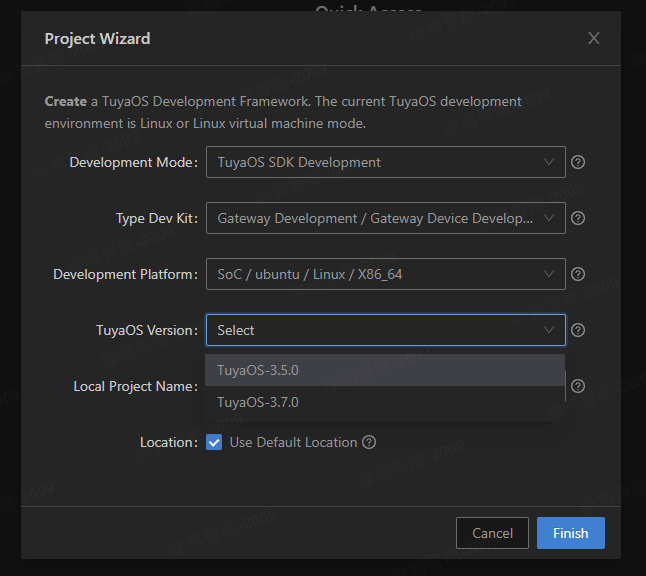
Select the latest version and click Finish to download the development package.
Porting and Adapting
TuyaOS defines a standardized TuyaOS Kernel Layer (TKL), which aims to shield hardware and system differences and achieve cross-platform compatibility. The definition and example implementation code of the TKL interface are placed in the development environment and will be updated and released with the development environment.
In this article, we use the gateway development framework of the Ubuntu platform, and the corresponding TKL interface example is located at software/TuyaOS/vendor/ubuntu-x64/tuyaos/tuyaos_adapter/src.
For quick experience, we only need to modify the tkl_wired.c file and change the macro definition WIRED_IFNAME to the network interface name of your system. Other than that, directly use the example code without modification.
Compile and Run
The gateway development framework provides some application sample projects, located in the apps directory. In this article, we use tuyaos_demo_gw as a demonstration. Right-click tuyaos_demo_gw in the IDE, and select Build Project from the pop-up menu to compile.
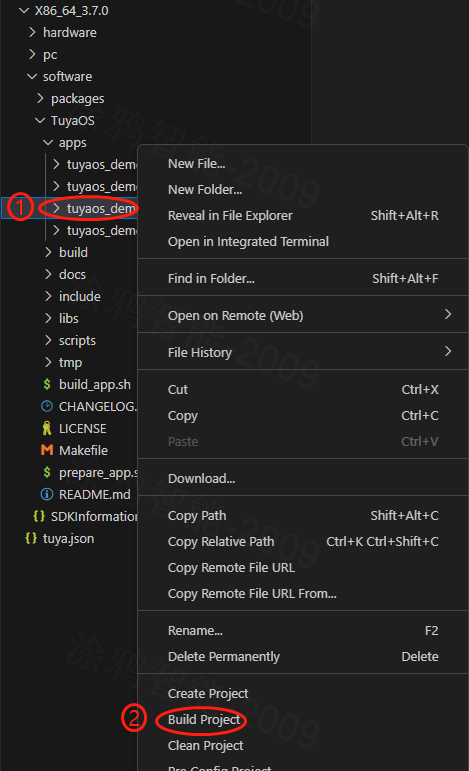
After successful compilation, the compiled executable program is located in the output/tuyaos_demo_gw_<version number> directory. Switch to that directory and run it directly.
Quick Experience
After the gateway program runs, it will use the network interface you selected in [Porting and Adapting](#Porting and Adapting) to send UDP broadcasts. The log will be printed as follows:
Code: Select all
[01-01 00:00:05 TUYA D][tuya_svc_lan.c:838] udp ip: 192.168.1.20Open the Smart Life App and use Automatic Addition to discover and add the gateway device.
The tuyaos_demo_gw application example will simulate a sub-device. Click Add Sub-device on the gateway panel to add a switch device. After adding, you can control it.
Next Steps
- To learn more about the TuyaOS gateway development framework's functions, please refer to the Capability Map.
- To better perform cross-platform development, dive deep into the interface and implementation of the TuyaOS Kernel Layer (TKL), please refer to the Porting Guide.